In this case, we have a workflow that sends meeting invites to people who join by filling a form. So when the form is submitted, the flow adds the new user to the invite.
The issue is that everyone else is getting an update on the event which can be annoying when we have 100s of the people signing up.
What we need to do is to add the new person to the invite and send it to them without sending an update to the existing users. The Update Event (V4) will send the update the everyone.
The Solution is to use the action: Send an HTTP request (Office 365 Outlook). This action is available in the Standard license, no need for premium license to use it.
Only include the properties you want to change, e.g. { "attendees": [ { "emailAddress": { "address": "alexw@contoso.com", "name": "Alex Wilber" }, "type": "required" // "optional" or "resource" also allowed } ] }
I have been struggling with an issue where I has a .NET MAUI Blazor hybrid worked just fine in hot restart when connecting to my PC (both Debug and Release Modes).
After a lot of trials, it seems this is happening even in .NET MAUI Blazor out of the box template.
This seems to be an issue in .NET MAUI. The workaround is to use interpreter instead of AOT. Simply add this line to the Project file:
Here are the steps needed in order to have cascading dropdowns in a Model driven app. Example: User selects a country and then selects state inside that country.
Example DataVerse structure:
A Country Table: holds names of countries
A State Table: hold names of State with a lookup to the country where the state belong
A Location Table: a custom table that has 2 lookups: one lookup for Country and another lookup for State
We can then create a model driven app with these 3 tables
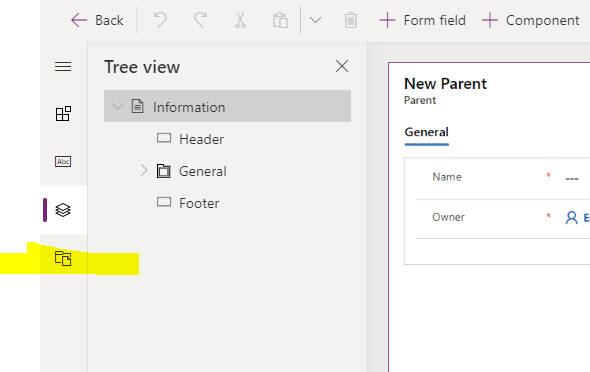
We then need to go to the Location table Main form (or whatever form that is being used in the model driven app) and we need to add a JavaScript Web Resource
You can then simply click the Text Editor to paste the JavaScript code
The Code is
var Sdk = window.Sdk || {};
(function () {
    // Define some global variables
    var myUniqueId = "_myUniqueId"; // Define an ID for the notification
    var currentUserName = Xrm.Utility.getGlobalContext().userSettings.userName; // get current user name
    var message = currentUserName + ": Your JavaScript code in action!";

    // Code to run in the form OnLoad event
    this.formOnLoad = function (executionContext) {

    }

    // Code to run in the attribute OnChange event
    this.attributeOnChange = function (executionContext) {

        var formContext = executionContext.getFormContext();

        var country = formContext.getAttribute("cr82b_country").getValue();
        if (country != null && country[0] != null) {
            formContext.ui.setFormNotification("Country=" + country[0].name, "INFO", myUniqueId);
            window.setTimeout(function () { formContext.ui.clearFormNotification(myUniqueId); }, 5000);
        }

        var stateControl = formContext.getControl("cr82b_state");
        stateControl.addPreSearch(Sdk.filterStates);
    }


    Sdk.filterStates = function () {

        var formContext = Xrm.Page.getControl("cr82b_country").formContext;
        var country = formContext.getAttribute("cr82b_country").getValue();
        if (country != null && country[0] != null) {
            var stateFilter = "<filter type='and'><condition attribute='cr82b_country' operator='eq' value='" + country[0].id + "'/></filter>";
            formContext.getControl("cr82b_state").addCustomFilter(stateFilter);
        }
    }

    // Code to run in the form OnSave event
    this.formOnSave = function () {

    }
}).call(Sdk);
The main idea is to inject an OnChange Event to the Country Field and based on it, create a filter for States lookup
After publishing the script, refresh the Model driven app and you will see the filtering working (clicking “All records” after selecting a country, will only show states inside that country)
Power Apps has two sets of rules for showing/hiding buttons: Display rules and Enable rules. Display rules are running on the server side and enable rules are running on the client site (maybe counterintuitive). Custom rules (JavaScript rules) are therefore only available in client side (Enable rules).
As an example, assumed we have two Tables (Parent and Child) with a one to many relation (Parent can have multiple children, child can only have one parent). We want to disable the “Deactivate” button on the Parent if it has children.
Preparations:
In the make.powerapps.com, create 2 tables (Parent and Child) and set the relations between them
Create a new Solution (example: RibbonEntitiesTest) and Add the two tables to it. This is needed for the Ribbon workbench to work.
Create another Model driven application with the Parent and Child Tables for testing
Adding the JavaScript code with the logic:
From make.powerapps.com, Select the table (Parent in our case) and Navigate to the
2) Navigate to the form where the ribbon is: (Main Information form for example)
3) Click the Form libraries tab on the left navigation
4) Click “Add Library” and then Click “New”
5) Set the library name, Type and Language
6) Either upload a new file or paste code directly in the Text Editor. Use the following code
var AB = AB || {};

AB.Ribbon = (function () {
    var isButtonEnabled = false;

    function IsButtonEnabled(formContext) {

        return new Promise(function (resolve, reject) {
            var Entity = "cr33f_child";
            var Select = "?$select=cr33f_name";
            var Filter = "&$filter=cr33f_Parent/new_parentid eq '" + formContext.data._entity._entityId.guid + "'";

            Xrm.WebApi.retrieveMultipleRecords(Entity, Select + Filter).then(
                function success(result) {
                    if (result.entities.length == 0) {
                        isButtonEnabled = true;
                    }

                    // return true or false
                    resolve(isButtonEnabled);
                },
                function (error) {
                    reject(error.message);
                    console.log(error.message);
                }
            );
        });
    }

    return {
        IsButtonEnabled: IsButtonEnabled
    };
})();
Note: you will have different prefixes (cr33f) and make sure of casing as the query is case sensitive
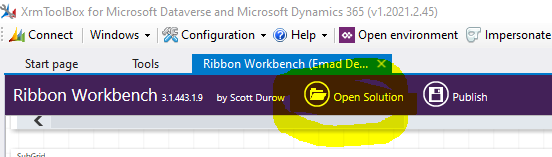
3) In the Ribbon workbench, click “Open Solution” and select the solution that has the tables, in this example: RibbonEntitiesTest.
4) Select the entity whose ribbon we need to customize, in our case, parent entity
5) Select the button we need to customize and click “Customize Command” (NOT customize button)
6) Click the Command and in the Enable rules click “Add Enable rule”
7) Click “Add Step” and select “Custom Rule”
8) Set the function name, library name (use autocomplete feature) and Add parameter (Primary control)
9) Click “Publish” (sometimes it takes up to 10 minutes to complete)
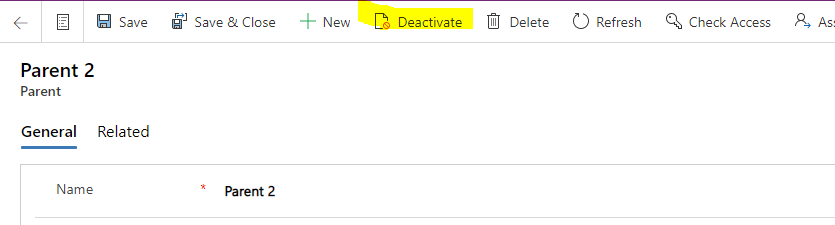
10) Test ! you can check a parent entity with no related children should have the “Deactivate” button shown while a parent with related children should not
Troubleshooting
One simple way to troubleshoot is to add &ribbondebug=true to the url. this will show a new button called “Command Checker”
if you click it , you can see more information like
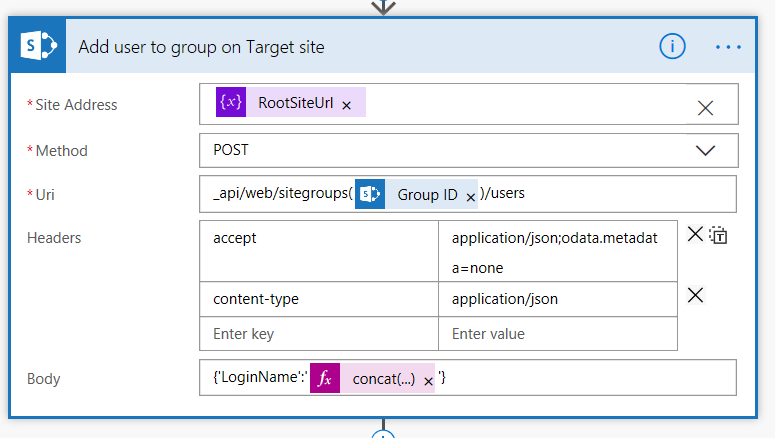
In Microsoft flow there is no built in action to add a user to a SharePoint group. One way to achieve this is to use the “Send HTTP request to SharePoint”
in this action you need to
Set the URL of the Site
Set method to “POST”
URI set to “_api/web/sitegroups({GROUPID})/users”, example: _api/web/sitegroups(10)/users
Add header with key=”accept” and value = “application/json;odata.metadata=none”
Add header with key =”content-type” and value = “application/json”
Set the Body to be {‘LoginName’:’i:0#.f|membership|[EMAIL ADDRESS]’}, example: {‘LoginName’:’i:0#.f|membership|john.doe@domain.onmicrosoft.com’}
It would look like this
This is tested with a SharePoint online connection but assume might work with on premise SharePoint as well.
When trying to install SP2013 on a windows 2012R2 or 2016 you may get the error : Error: The tool was unable to install Application Server Role, Web Server (IIS) Role
A quick fix might be to go to C:\Windows\System32\ , look for ServerManager.exe, make a copy and name it ServerManagerCMD.exe as this is the file that the SP prereqs is trying to call